or Further Adventures in Sprue-Stretching Land


On one of my recent trips to Ely's excellent City Cycle Centre model shop I saw a selection of Roco Minitanks kits. And, not (so far as I'm aware) ever having seen (or at least noticed) this particular brand before, I thought I'd try one out.
I was stumped as to the scale, as the box doesn't mention scale anywhere. I always find that odd and irritating in equal measure. But as the kit was pretty cheap (£7.50), I figured 'what the heck!?' And brought a Bergepanzer Tiger I anyway.
I asked the guy in the shop - unfortunately for me he wasn't the usual guy, who knows his onions - and he thought it was the usual 1/72, or perhaps 1/76. I thought it looked a bit dinky for 1/72, but wasn't sure, so took a speculative punt. My pal Paul put me right, telling me it is in fact 1/87, or the same as the popular HO railway scale.

Preparing to drill holes in the cable-ends; 0.5mm drill bit!

Starting the holes with the tip of scalpel, in an effort to get them central.
Well, that was a touch annoying to find out, as I'm concentrating my German WWII armour collection in 1/72, with a few 1/76 kits (mostly Airfix, with a couple of Milicast) thrown in. 1/87 is sure to be too small to field on the same table, methinks. Still, it can go in the background on occasional diorama-esque photo-shoots, perhaps?
The kit itself is very simple and basic, being one of those where the left and right tracks and running gear are supplied as a pair of pre-cast blocks. The towing cables and the crane cable were all absent from the kit. So I decided to stretch a bit more sprue.

The completed cables. The extra bits I cut off can be seen at upper-left.
My practice earlier in the week meant that I achieved a 100% success rate on this occasion! I trimmed some bits of the styrene cable ends, which where supplied, but had extra bits for you to attach some wire or thread to. I opted to chop these extra bits of plastic off, drill tiny holes in the cable-ends proper (the stretched sprue is very thin/fine!), and then glue it all together.
This prep stage was fiddly, for sure, but not as tricky as gluing the styrene cables to the body of the tank, or attaching the cable to the crane. I didn't take the usual run of documentary pics on this build, so this post isn't very well illustrated. The build was a last minute laste night whim, and I just went at it!

The wire/cable that runs across the top of the crane was also added with stretched sprue. Getting it attached stretched my patience!
Conclusion: whilst I have admittedly not quite finished building, or rather painting, this kit, here are a few thoughts. Plus points include the simplicity of build, and clean crisp moulding (almost no 'flash' at all!), both of which rate as excellent. On the downside, however, there is a lack of detail, due to the same simplicity. And, for me, as good as the model may be, there's the scale issue; 1/87 is fine in and of itself, but it won't mix with 1/72, when even 1/76 is discernibly smaller.


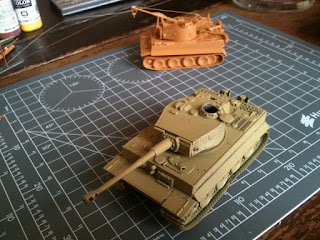

95% of my models are packed away; bubble-wrapped and boxed. But I decided to get out a 1/72 Tiger (turned out to be the Dragon one) for a scale comparison.

To the naked eye the difference is obvious immediately, and looks pretty massive. Strangely it looks less apparent in this pic.

Father Ted to Father Dougal: 'Dis Toiger I is small, dat Toiger I is far away!'
No comments:
Post a Comment